 Skip to content
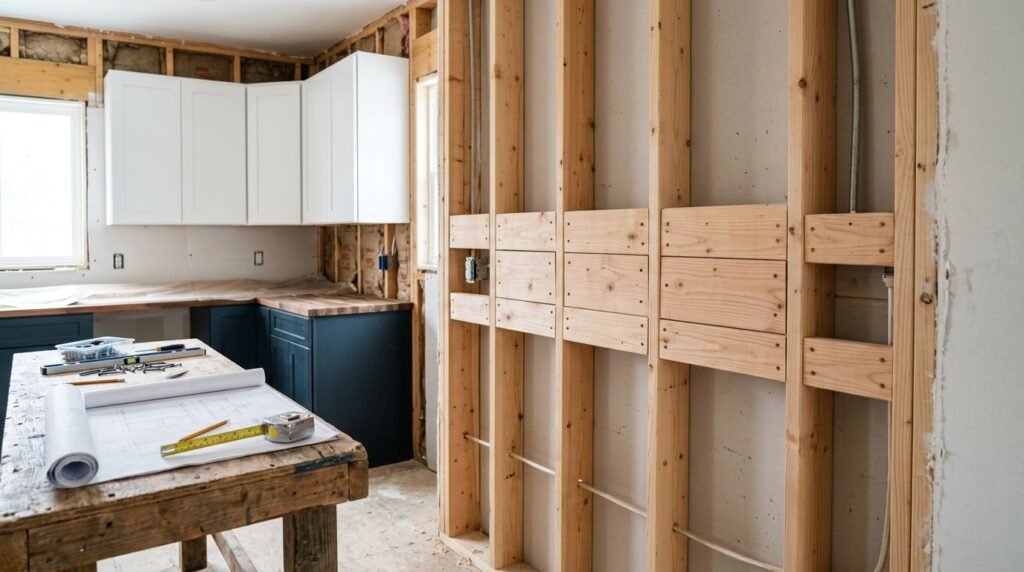
A beautiful cabinet wall can still fail if there is nothing solid behind the drywall. Once the wall is closed, a missed fastening point can mean opening new drywall, moving wiring, and delaying the installation.
Upper cabinet blocking gives installers solid wood where cabinet mounting rails need it. However, blocking only works when it follows a final cabinet layout rather than an early sketch.
Confirm the plan, the cabinet specifications, and wall conditions before the framing disappears.
Start With the Approved Cabinet Layout
Blocking should follow cabinet elevations, appliance specifications, and actual room measurements. A finalized cabinet design identifies cabinet widths, finished countertop height, filler panels, decorative hoods, and any changes in cabinet depth.
For a kitchen remodel, pair the drawings with appliance cut sheets and a measured wall plan. A kitchen cabinet measurements guide can help you record openings, ceiling height, and utility locations before framing gets covered.
Mark cabinet boundaries, not only a height
Installers need more than one horizontal line. Mark the left and right edge of each cabinet run, the top and bottom mounting-rail locations, and the centerlines for hoods or specialty cabinets.
A typical finished countertop sits 36 inches above the floor. Upper cabinets often begin around 54 inches above the floor, leaving an 18-inch backsplash area. Those dimensions are common planning references, not universal rules. Cabinet height, ceiling details, countertop thickness, and range-hood instructions can change the layout.
Account for heavy and unusual wall loads
A standard upper cabinet often catches multiple studs. Yet glass-door cabinets, deep pantry-style wall cabinets, floating shelves, microwave cabinets, and decorative range hoods may need backing in different places.
A block installed before final cabinet widths are approved can land behind a cabinet opening instead of behind its mounting rail.
Confirm where every item attaches before the framer installs blocking. Also coordinate outlet boxes, plumbing vents, HVAC runs, and low-voltage wiring so cabinet screws won’t meet an unexpected obstruction later.
Upper Cabinet Blocking: Code and Practice
Florida’s general residential code does not set a statewide schedule requiring blocking across every ordinary upper-cabinet wall before drywall. Instead, permitted work must follow applicable framing rules, approved plans, local amendments, and any product or manufacturer requirements that apply to the project.
That distinction matters. Building-code provisions govern the construction work that requires compliance. Cabinet-maker instructions describe how their products must be installed for proper support and warranty coverage.
The High-Velocity Hurricane Zone exception
Florida Building Code provisions for the High-Velocity Hurricane Zone include an explicit requirement for wall cabinets. They call for a minimum 2×4 horizontal wood member securely fastened to at least two studs for each wall cabinet attachment.
That zone includes Miami-Dade and Broward counties, not Fort Myers or Lee County. Still, remodelers should verify the current code edition and local amendments with the applicable building department. A local official or qualified professional can confirm what a permitted project requires.
Don’t confuse cabinet backing with drywall or fire blocking
Drywall backing and fireblocking have their own framing rules. A block installed to support a gypsum-board edge may not align with a cabinet rail, and cabinet backing does not replace required fireblocking.
Likewise, drywall anchors are not a structural mounting plan for loaded upper cabinets. The cabinet must fasten into studs or properly installed solid backing at locations approved by its manufacturer.
Match the Backing to the Cabinet Manufacturer’s Instructions
Cabinet brands vary in their mounting rails, screw locations, box construction, and weight limits. Review the installation manual before deciding the number, height, and length of blocks.
Lowe’s upper-cabinet installation guidance, for example, directs installers to locate studs and fasten through cabinet back rails. It also uses a straight temporary ledger board to hold cabinets at the reference height during installation.
Use studs first, then add blocking where it helps
Wood studs are the preferred fastening target, and metal stud walls need different fasteners and techniques. When cabinet mounting points don’t land on enough studs, upper cabinet blocking can create the solid fastening surface the plan needs.
Install horizontal wood blocking between studs with its face flush to the stud faces. Place it where the cabinet’s upper or lower mounting rail will sit, based on the actual cabinet drawings. A framer should use connections appropriate for the wall assembly and local requirements.
Follow the specified screw pattern
Many installation guides call for screws through the cabinet’s mounting rails into framing. Trade instructions often reference 2.5-inch to 3-inch wood screws, but that range is only typical. Cabinet material, drywall thickness, rail design, and blocking depth affect the correct fastener.
Follow the cabinet manufacturer’s required screw type, length, quantity, and placement. A temporary 1×4 ledger board helps support the cabinet during hanging, but it does not replace screws driven into framing or approved backing.
For tailored layouts, a professional cabinet layout consultation can settle these details before the drywall crew arrives.
Complete a Pre-Drywall Cabinet Check
The best time to find a layout problem is when the studs remain visible. Take a few minutes to verify the wall against the approved elevation, then document what is inside it.
Mark, photograph, and approve the wall
Use this short sequence before drywall goes up:
- Mark the finished floor reference and cabinet mounting-rail heights on the studs.
- Label stud centers and installed blocking with their height above the finished floor.
- Check that blocking sits flush with the framing face and spans the planned screw locations.
- Confirm that electrical, plumbing, ductwork, and protective plates don’t conflict with cabinet fasteners.
- Photograph each cabinet wall with a tape measure visible, then save the images with the project drawings.
Those photos are useful months later when an installer needs to find backing without guessing. They also help if a cabinet width changes before delivery.
Recheck changes before closing the wall
A late decision to add a wider hood, open shelving, or a floating vanity can alter the backing plan. Update the framing before drywall, not after the finish work begins.
A cabinet installation preparation guide can help keep site access, measurements, appliances, and final installation details organized.
A Wall Ready for Lasting Cabinetry
Upper cabinet blocking is a small framing task with a large effect on installation quality. It gives the installer a dependable fastening surface and protects the cabinet layout from costly wall repairs.
Verify the final drawings, follow the cabinet manufacturer’s instructions, and confirm local code requirements before drywall closes the wall. Solid backing in the right location is what turns a cabinet plan into a secure finished installation.
