
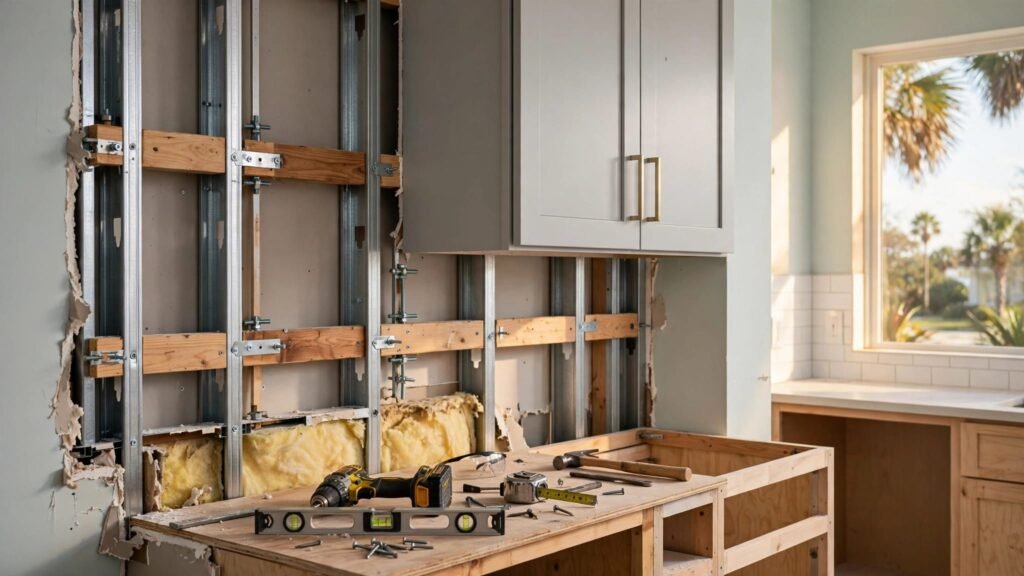
A beautiful kitchen can lose its appeal fast if a wall cabinet shifts, sags, or pulls away from the wall. In Fort Myers homes, many interior partitions use light-gauge steel studs, so the usual wood-stud installation habits don’t always apply.
To fasten cabinets to metal studs, you need more than long screws and a stud finder. Heavy cabinets, stoneware, food, and countertop appliances create a load that drywall alone cannot carry. Start with the wall structure, then match the installation method to the cabinet weight and condition of the framing.
Start With the Wall, Not the Cabinet
Cabinet installation goes more smoothly when the wall is assessed before cabinets arrive. This is especially true during a remodel, when adding backing is far easier before drywall goes up.
Identify steel studs and their spacing
A strong magnet can locate the drywall screws that run along a metal stud. An electronic stud finder with a metal-detection setting can also help, although it may react to pipes, corner bead, or electrical boxes.
Mark each suspected stud from cabinet height down toward the floor. Then confirm its location in several places. Most metal studs run vertically, but a wall may have offsets, openings, soffits, or framing changes that interrupt the expected pattern.
Measure stud spacing before planning the cabinet rail or ledger board. Do not assume every wall follows the same layout. Older renovations can contain a mix of wood and steel framing, particularly near windows, bulkheads, and previous plumbing repairs.
Determine what the wall is designed to hold
Many steel studs in interior partitions are thin, non-load-bearing members. They hold drywall well, but their thin flanges don’t offer the same screw-holding strength as a solid wood stud.
Florida Tech’s metal-stud framing standards call for blocking at wall cabinets, countertops, plumbing fixtures, and accessories. A Florida Building Code wall and partition note also identifies at least 20-gauge studs for wall-hung cabinets and plumbing fixtures in that listed condition.
Those references do not create a universal fastening rule for every Fort Myers home. They do show why cabinet loads deserve more planning than a picture frame or towel bar.
Drywall can help keep a cabinet tight to the wall, but it should not be the primary support for a loaded wall cabinet.
If you cannot identify the stud gauge, the wall’s backing, or the cabinet support path, pause before drilling. A licensed contractor or structural professional can inspect the assembly and recommend an attachment method.
Plan Cabinet Design Around Real Support Points
A thoughtful cabinet design accounts for more than door style and storage. It also considers wall conditions, appliance placement, cabinet height, and where heavy pieces will attach.
A run of upper cabinets may include a refrigerator surround, pantry cabinet, microwave cabinet, or glass-front display. These units don’t all place the same demand on the wall. Deep cabinets filled with dishes can weigh far more than a shallow decorative cabinet.
Before finalizing dimensions, map the stud locations onto the wall elevation. If the layout places a cabinet joint between studs, the installer may need a continuous rail, added blocking, or revised cabinet widths.
A Fort Myers cabinet design consultation can bring cabinet layout, wall conditions, and installation details into the same early conversation. That helps avoid a costly surprise after custom cabinets are delivered.
Account for the full loaded weight
Never judge cabinet support by the weight of an empty box. Add the cabinet itself, adjustable shelves, doors, hardware, dishes, food, small appliances, and any decorative items stored above eye level.
A cabinet holding everyday dinnerware has a much different load than one holding plastic cups. Likewise, a bathroom vanity cabinet may carry a heavy countertop and sink, although floor-supported vanities transfer much of that weight downward.
Wall cabinets need a clear load path. The cabinet back, hanging rail, screws, blocking, and studs must work together. One strong screw cannot make up for weak support across the rest of the installation.
Choose Backing Before Choosing Fasteners
The strongest cabinet attachment is usually direct fastening into properly prepared backing or suitably robust studs. When a wall is open, install the support structure before insulation and drywall.
Use wood or plywood blocking in open walls
Solid wood blocking or 3/4-inch plywood backing between studs gives cabinet screws a substantial base. It also spreads the load across several studs rather than concentrating it on thin steel flanges.
Install backing at the intended upper cabinet screw height. Many cabinet systems use a top mounting rail, but verify the actual screw locations from the cabinet manufacturer before the wall is closed. Secure the blocking to the metal studs according to the framing plan.
Plywood backing works well for a long cabinet run because it gives installers flexibility if cabinet widths change slightly. However, the backing must connect securely to the stud system. Loose plywood behind drywall is not a structural solution.
Retrofit backing when drywall is already installed
Closed walls require more care. A contractor may open a horizontal section of drywall behind the future cabinet run, add blocking between studs, then patch the opening before installation.
Another option is a continuous support rail designed for the cabinet system. The rail still needs secure attachment to appropriate studs or structural backing. It does not turn weak drywall into a suitable support surface.
Do not rely on plastic anchors, basic drywall anchors, or drywall screws for loaded wall cabinets. Toggle-style anchors can have a place in light-duty work, but they are not a substitute for a properly designed support system when cabinets will carry substantial weight.
How to Fasten Cabinets to Metal Studs Safely
Once the wall has suitable backing or verified studs, install cabinets with a method that matches the assembly. Follow the cabinet maker’s installation instructions first, since some brands use integrated hanging rails or reinforced backs.
Use fasteners made for light-gauge steel
Fasteners for metal studs need threads or drilling points that engage thin steel effectively. Fine-thread screws are commonly made for light-gauge steel applications, while coarse-thread screws are generally associated with wood framing.
The screw must pass through the cabinet mounting rail or solid back, drywall, and steel or backing with enough engagement to do its job. Yet a longer screw isn’t automatically safer. A screw that reaches too far can hit wiring, plumbing, ductwork, or a pipe behind the wall.
Avoid guessing at pull-out capacity. Holding strength depends on stud gauge, screw diameter, thread type, steel engagement, cabinet construction, load distribution, and whether blocking is present. Product-specific data and the complete wall assembly matter.
Fasten through the cabinet’s structural rails
Most quality wall cabinets have solid mounting rails near the top and sometimes near the bottom. Drive fasteners through these reinforced areas, not through thin cabinet backs or shelf panels.
Set a temporary ledger board level along the bottom edge of the upper cabinet run. The board supports cabinet weight during installation and keeps the first cabinet from slipping. Remove it after all cabinets are joined, leveled, and fully secured.
Install the first cabinet at a corner or a clearly established reference point. Check it for level, plumb, and proper height. Then clamp adjoining face frames together before joining cabinets according to the manufacturer’s instructions.
Do not tighten one screw so aggressively that it crushes drywall or bends the cabinet back. A cabinet should sit firmly against the wall, with shims where needed to correct an uneven surface. Overdriving can weaken the connection you intended to strengthen.
Protect Plumbing, Electrical, and Mechanical Work
A cabinet screw can cause expensive damage if it enters a concealed pipe or wire. Metal studs often carry electrical wiring through factory punch-outs, and plumbing may run behind kitchen or bath walls.
Turn off power to the affected area before opening walls or drilling near outlets and switches. Locate electrical boxes, water lines, drain lines, vent stacks, and HVAC components before placing fasteners.
Florida Tech’s framing standards call for coordination of anchors and blocking with electrical and mechanical work behind stud framing. That coordination matters most when you are adding backing after rough-in work is complete.
Watch for protected stud penetrations
Steel studs may contain grommets or protective plates where wires pass through. Do not remove these protections or drill through a stud without checking what occupies the cavity.
If a screw hits metal unexpectedly, stop. It may be a stud, but it could also be a protective plate covering a wire or pipe. Recheck the location before continuing.
Kitchen sink walls, dishwasher areas, refrigerator water-line locations, shower-adjacent bathroom walls, and laundry rooms deserve added caution. A licensed electrician or plumber should handle any uncertainty around concealed utilities.
Manage Fort Myers Humidity and Coastal Conditions
Southwest Florida heat and humidity affect cabinet materials, wall cavities, and hardware. Homes closer to the coast may also experience salty air that accelerates corrosion on unsuitable metal components.
Choose corrosion-resistant fasteners and compatible framing hardware where moisture exposure is likely. This is particularly important for outdoor kitchens, garages, laundry rooms, pool-adjacent cabinetry, and poorly ventilated bathrooms.
Keep cabinets away from active leaks and address water damage before mounting anything. Drywall that feels soft, stained, swollen, or crumbly cannot provide a stable mounting surface. The same goes for rusted studs or deteriorated backing.
For kitchen projects, review cabinet construction and finish advice before selecting materials. Durable boxes, moisture-conscious finishes, and proper installation all affect how cabinetry performs through humid seasons.
Don’t hide a moisture problem behind new cabinets
New cabinets can conceal a slow plumbing leak for months. Inspect supply valves, drain connections, refrigerator lines, and exterior-wall penetrations before installation.
In bathrooms, use ventilation consistently and repair failed caulk or grout near wet areas. Cabinets should enhance a room, not cover evidence of water intrusion.
If you see rust on studs, mold-like growth, persistent dampness, or damaged drywall, correct the source first. A fresh cabinet installation cannot solve a wall-cavity problem.
Know When DIY Stops Being the Right Choice
DIY installation can work when the wall structure is clear, cabinets are modest in weight, and the installer has the tools to level, shim, clamp, and fasten accurately. Still, steel stud walls leave less room for trial and error.
Bring in a licensed contractor when upper cabinets are heavy, the wall lacks visible backing, studs appear thin or damaged, or utility locations are uncertain. Professional help also makes sense for tall pantry units, floating vanities, large entertainment cabinetry, and any project involving structural changes.
Ask direct questions before installation begins:
- Which studs or backing points will carry the cabinet load?
- Are the wall cabinets attaching through solid mounting rails?
- What fasteners match the stud gauge and cabinet system?
- Where are electrical, plumbing, and mechanical lines located?
- Does the wall need blocking before cabinetry is installed?
A careful plan protects the cabinets, finishes, and people using the room every day.
Final Thoughts on Metal Stud Cabinet Installation
To fasten cabinets to metal studs successfully, treat drywall as a finish surface rather than the main support. Strong results come from verified studs, solid blocking or backing, compatible fasteners, and cabinet rails that distribute the load.
Fort Myers homes also call for attention to humidity, corrosion, and concealed utilities. When the wall assembly is unclear, proper support is worth more than a quick installation.