
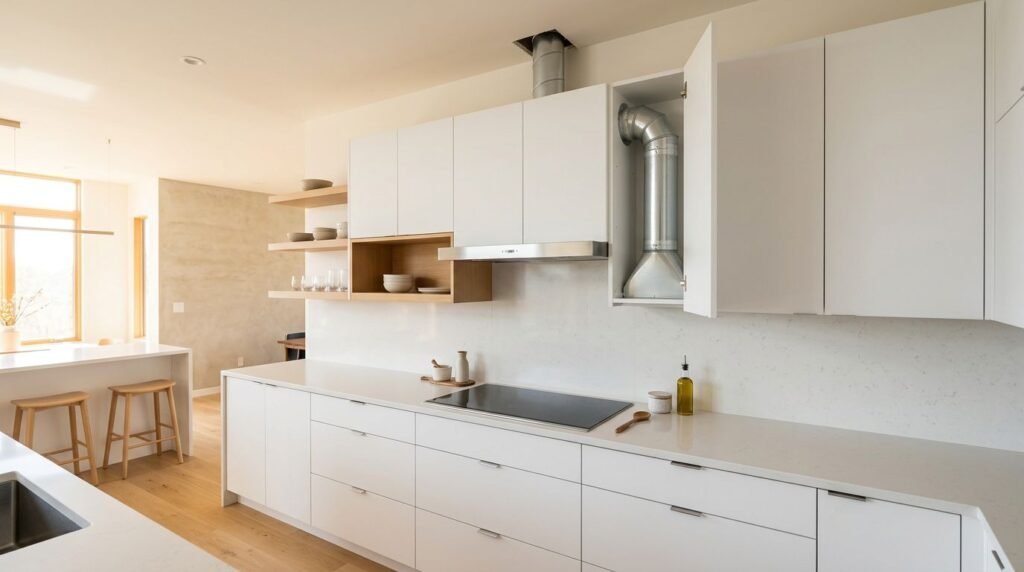
When homeowners choose cabinets before settling on the hood, the upper wall can change later. The hidden path for range hood ductwork may take space inside a cabinet, above it, or through the ceiling.
That decision affects cabinet width, depth, height, fillers, soffits, and the visual center of the kitchen. Good planning connects the cooking appliance, hood, duct route, and cabinet elevation before anything is ordered.
Use the guidance below to plan a clean range wall, then have qualified professionals confirm the installation and local requirements.
Range Hood Ductwork Has to Be Planned Before Upper Cabinets
Upper cabinets often look simple in a floor plan. Above the range, however, the hood and its duct need dedicated space. A few inches of unplanned ductwork can force a cabinet change after the order is placed.
Start with the hood and cooking surface
Choose the range or cooktop and hood together. The appliance determines the cooking width, while the hood model determines its required width, depth, height, blower location, and duct connection.
Many homeowners choose a hood that matches or exceeds the width of the cooking surface, but the appliance manufacturer and hood manufacturer provide the final requirements. Under-cabinet hoods, built-in inserts, wall-mounted chimney hoods, and island hoods all create different cabinet plans.
An insert may sit inside a custom cabinet or wood canopy. An under-cabinet model may replace the cabinet above the range. A chimney hood usually leaves the center of the wall open, with upper cabinets stopping on each side.
These range hood cabinet design ideas can help you compare the visual and storage effects of each setup.
Draw the duct route on the wall elevation
A floor plan shows width and traffic flow, but it doesn’t show what happens above the range. Ask your designer or contractor to draw a wall elevation that includes the range, hood, upper cabinets, ceiling, windows, and duct route.
The drawing should show where the duct exits the hood. It should also show whether the duct travels straight up, turns into a wall, passes through a soffit, or continues through the ceiling.
That path may determine whether the cabinet above the appliance needs a false back, a modified top, a reduced interior, or no storage at all. It can also affect the width of adjacent cabinets and the placement of decorative panels.
Good cabinet design starts with the actual hood and duct dimensions, not an empty rectangle on a plan.
How Duct Routes Take Space Above the Range
The shortest practical duct route usually creates the simplest cabinet layout. Long runs and multiple turns require more coordination because each change takes room and may affect airflow.
A straight route preserves more cabinet space
When the hood connects to a duct that rises directly through the wall or ceiling, the surrounding cabinets have fewer obstacles. A wall hood can hide the vertical section inside its chimney cover. An insert may use a cabinet chase designed around the duct.
A straight route also makes the hood centerline easier to align with the range. That alignment matters because an off-center hood can make the entire cabinet wall look unbalanced, even when the upper boxes are level.
The duct diameter must match the hood manufacturer’s instructions. Depending on the model and airflow, a hood may require a 6-inch, 7-inch, 8-inch, or 10-inch duct. Never reduce the diameter simply to fit an upper cabinet.
Smooth, rigid metal ducting is often preferred for a reliable route, but the contractor must confirm the permitted materials and installation details for your jurisdiction.
Turns and soffits change the cabinet elevation
A duct that turns horizontally may need a chase above the cabinets. That chase can appear as a soffit, a boxed section, or a deeper top panel. In some kitchens, the cabinet tops can hide the change. In others, the duct creates a visible band across the wall.
The location of ceiling joists, wall studs, plumbing, wiring, and exterior walls also affects the route. A nearby exterior wall may offer a shorter path, while an interior range wall may require a longer run.
If the duct must pass beside a cabinet, the designer may add a filler or narrow utility cabinet. If it passes through a cabinet, the cabinet may lose usable storage. Either option is easier to accept when shown before the order.
A duct route that looks small in a sketch can remove an entire shelf, reduce cabinet depth, or change the height of the upper run.
Plan Upper Cabinet Dimensions Around the Hood
Upper cabinets usually follow standard dimensions, but the range wall often needs a custom adjustment. The hood is both a working appliance and a strong visual feature, so its proportions need to fit the cabinet run.
Check cabinet depth, hood depth, and clearances
Many standard wall cabinets are about 12 inches deep. Some layouts use deeper cabinets, but the hood may extend farther than the surrounding doors. That extra projection can affect head clearance, sightlines, and the amount of space available for duct connections.
Compare the hood depth with the cabinet depth before selecting door styles. A cabinet-mounted hood may require a modified box or a deeper section. A chimney hood may project independently, but its duct cover still needs room to connect correctly.
Hood height above the cooking surface also needs attention. Many electric cooking installations use a planning range of 24 to 30 inches, but the hood manual, appliance instructions, and local requirements control the final measurement. Gas appliances may have different clearance requirements.
Review planning cabinet depth around appliances before finalizing the range wall. Small changes to depth can affect handle clearance and the way the hood sits over the cooktop.
Frame the hood without crowding it
Upper cabinets can frame a hood with equal-width boxes, staggered sections, glass doors, or open shelving. The best choice depends on the hood width and the wall available.
For example, a 36-inch hood may sit between two 18-inch cabinets on a wide wall. A narrower wall may need one cabinet on each side with fillers to keep doors clear of the hood and adjacent walls.
The cabinet above an insert needs enough interior room for the blower, liner, duct collar, wiring, and service access. Ask where filters are removed and how the unit will be serviced. A cabinet that looks finished but blocks maintenance will cause problems later.
Use a kitchen cabinet size guide to compare common heights and widths, then adjust the range wall around the actual appliance specifications.
Match the Cabinet Layout to the Hood Style
Each hood type changes how much upper storage remains around the cooking area. The table below gives a quick planning comparison.
| Hood setup | Effect on upper cabinets | Main planning concern |
|---|---|---|
| Under-cabinet hood | The cabinet above may house the hood | Match the cabinet width, depth, and outlet location |
| Built-in insert | A custom cabinet or canopy surrounds the insert | Leave room for the liner, blower, duct, and service access |
| Wall chimney hood | The center above the range stays open | Fit the chimney cover and frame it with balanced cabinets |
| Island hood | There may be no upper cabinets above the appliance | Route ductwork through the ceiling and coordinate structure |
An under-cabinet model can preserve a familiar cabinet layout, but the cabinet box often needs factory modifications. An insert gives you more control over the finished appearance, although the surrounding cabinet requires detailed measurements.
Wall chimney hoods create a focal point. They work well when the adjacent upper cabinets stop at the chimney cover instead of competing with it. Island hoods require a separate ceiling plan because the duct may pass through framing before it reaches an exterior termination.
The takeaway is simple: hood style determines where upper storage can begin and end.
Separate Design Guidance from Local Code Requirements
Cabinet planning can establish proportions and clearances, but it can’t approve the ventilation installation. Local rules vary by jurisdiction, appliance type, hood capacity, and building conditions.
Confirm the manufacturer’s installation instructions
Before cabinets are ordered, collect the hood manual and the range or cooktop manual. Look for the required hood width, mounting height, duct diameter, maximum duct length, allowable elbows, electrical connection, and termination instructions.
The manual may also show whether the hood can vent through the back, top, or both. That detail changes the cabinet box and wall layout.
A hood with a remote blower or a larger airflow rating may need more space than a basic under-cabinet unit. If the model is still undecided, avoid finalizing the cabinet above the range.
Have qualified professionals verify the installation
A licensed contractor, HVAC professional, electrician, or other qualified specialist should review the complete plan. Depending on the project, the review may cover permits, duct materials, exterior termination, electrical requirements, structural framing, fire safety, and makeup air.
Makeup air rules can apply to higher-airflow ventilation systems, and the threshold varies by jurisdiction. The local building department or permitting authority can confirm what applies to your home.
Cabinet dimensions should follow approved appliance and ventilation requirements, not replace them. If a designer suggests a shortcut that conflicts with the hood manual or local code, pause the cabinet order until the issue is resolved.
What to Confirm Before Ordering Cabinets
A short planning review can prevent expensive changes after delivery. Keep the following information with the cabinet drawings:
- Record the exact range or cooktop model, fuel type, width, depth, and installation requirements.
- Choose the hood model and note its overall dimensions, duct collar location, required clearance, airflow rating, and electrical needs.
- Mark the hood centerline on the wall elevation. Confirm that it aligns with the cooking surface and the planned cabinet layout.
- Draw the duct route, including vertical sections, horizontal turns, elbows, soffits, ceiling penetrations, and exterior termination.
- Confirm whether the duct passes inside a cabinet, behind a false panel, through a chimney cover, or above the cabinet run.
- Review upper cabinet depth, height, fillers, decorative panels, door swings, and interior access around the hood.
- Ask the appropriate contractor to verify permits, code requirements, makeup air, duct materials, and structural or electrical work.
- Schedule a final field measurement before fabrication or delivery. Walls, ceilings, soffits, and framing rarely match a rough sketch perfectly.
The preparing for cabinet installation process should also include appliance openings, utility locations, wall conditions, and access for the installation crew.
Conclusion
Range hood ductwork affects much more than ventilation. It can change the upper cabinet depth, the height of the cabinet run, the location of fillers, the size of nearby boxes, and the focal point above the range.
Choose the hood early, draw the duct route on the elevation, and match every cabinet adjustment to the appliance specifications. Then have qualified professionals verify the duct installation and local code requirements before the cabinet order is released.
A well-planned range wall gives the hood enough room to work while keeping the upper cabinets balanced, accessible, and suited to the way you use the kitchen.