
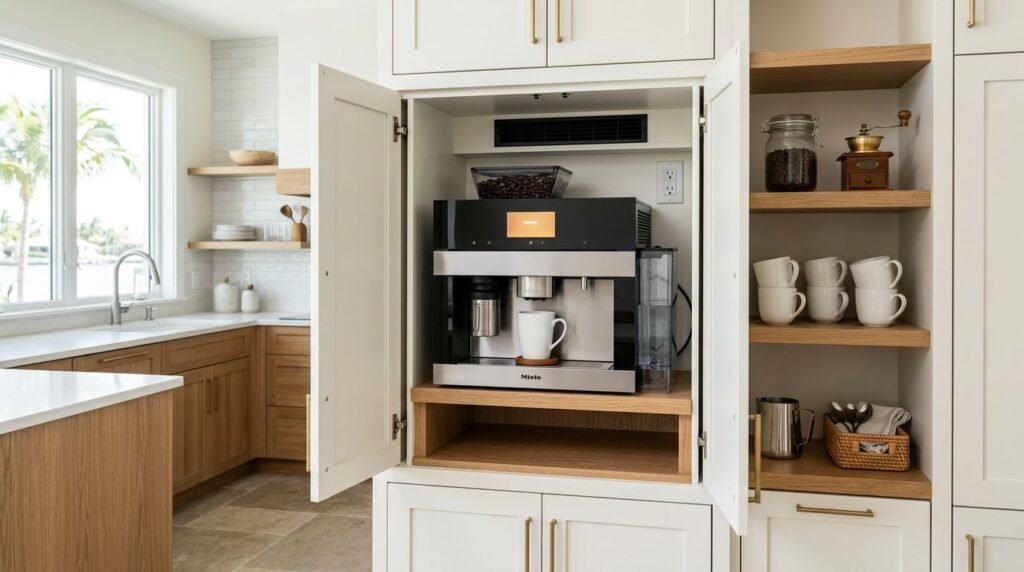
A built-in coffee machine cabinet can turn an unused kitchen wall into a polished morning station. However, the cabinet must fit the appliance’s cutout, electrical needs, ventilation requirements, and service access before the doors and panels are ordered.
Fort Myers homeowners also need to account for humidity, heat, and everyday sand or moisture near the kitchen. A good plan keeps the machine easy to use without sacrificing storage or creating a cabinet that traps heat. Start with the appliance specifications, then build the cabinet design around them.
Why the Appliance Should Shape the Cabinet Plan
A built-in coffee machine is different from a countertop brewer. It may need a precise opening, a reinforced shelf, ventilation space, and a nearby receptacle. Some models use a removable water reservoir, while others connect to a water supply and may require a drain. The cabinet cannot be designed correctly until you know which setup your selected machine uses.
Location also affects daily use. A tall cabinet at chest height often makes it easier to fill the reservoir, add coffee, remove the brew group, and wipe the interior. Placing the machine too low can force you to bend frequently. Placing it too high can make a full water container difficult to handle.
A cabinet beside the refrigerator, pantry, or wall oven can create a practical appliance zone. Still, leave enough room for the machine door to open fully. Check that the handle won’t strike an adjacent cabinet, wall, refrigerator door, or trim panel.
The surrounding counter also matters. You may want space for cups, beans, a grinder, or a small tray beneath the machine. Without a landing area, the coffee station can become crowded quickly.
Before choosing cabinet color or door style, collect these details:
- The appliance model and installation guide
- The required cutout width, height, and depth
- Door swing and handle clearance
- Electrical specifications
- Water and drain requirements, if applicable
- Ventilation openings and minimum clearances
- Access needed for cleaning and service
The installation guide is the controlling document. General cabinet planning can organize the space, but it cannot replace the manufacturer’s requirements or local code.
built-in coffee machine cabinet Dimensions and Clearances
A built-in coffee machine cabinet needs a cabinet opening, not merely an exterior box that looks large enough. Manufacturers usually list the exact cutout dimensions separately from the appliance’s overall dimensions. Those measurements can differ because the face frame, hinges, trim, and ventilation space affect the installation.
Measure the selected machine before finalizing the cabinet order. If you are still comparing appliances, ask your cabinet designer to leave a workable planning range, then confirm the final dimensions before production.
Standard kitchen measurements can provide a starting point, but they don’t automatically suit a built-in appliance. TEC Cabinetry Plus offers a useful kitchen cabinet sizing reference that covers common base, wall, and tall cabinet dimensions. A coffee machine niche may need a custom height, modified shelf, or filler to fit the machine without restricting access.
| Cabinet planning point | What to confirm |
|---|---|
| Opening size | Match the manufacturer’s required cutout, not only the appliance’s outside dimensions. |
| Cabinet depth | Confirm that the machine, connections, trim, and rear clearance fit without forcing the door forward. |
| Shelf support | Verify the shelf can support the appliance and withstand repeated loading during use. |
| Door swing | Check full opening clearance for the front door, tray, reservoir, and service components. |
| Ventilation | Follow the specified openings and clearances instead of sealing the niche tightly. |
| Service access | Keep removable panels or nearby access where the manufacturer or installer requires it. |
A cabinet that is slightly too wide may need finished fillers for a clean appearance. A cabinet that is too shallow can create a more serious problem because the appliance may project beyond the surrounding doors or block the handle.
Plan the opening around real use
Open the machine’s door on paper before construction begins. Account for the distance needed to remove the water tank, empty the grounds container, pull out the drip tray, and clean internal parts. These movements often require more space than the front elevation suggests.
Also check the countertop below. A machine installed above a counter should not drip onto a seam, backsplash joint, or outlet. If the cabinet includes a shelf below the appliance, leave enough room for cups and routine cleaning supplies.
The most common planning mistake is measuring the appliance face while ignoring the parts that pull forward, swing out, or need regular removal.
Electrical, Water, and Ventilation Requirements
Electrical planning should happen before cabinet installation, not after the cabinet installer arrives. The machine’s manual will identify the required voltage, amperage, receptacle type, cord location, and circuit instructions. Your electrician should review those details and follow the current local electrical code.
Avoid placing the receptacle where the appliance will crush the cord or prevent the machine from sitting at the required depth. Depending on the model, the outlet may need to sit in an adjacent cabinet, behind an accessible service area, or in another location listed by the manufacturer. Never cut a cabinet opening around an outlet without confirming the approved installation method.
Water-connected machines need a more detailed plan. The plumber may need to install a shutoff valve, supply line, filter, drain connection, or pressure control. The route should remain accessible after the cabinet is complete. A hidden connection that cannot be inspected or closed can make future maintenance difficult.
Reservoir models still need clearance for refilling. If the tank slides out from the top or side, check that the cabinet above does not block its removal. A machine that technically fits but requires moving the appliance every morning is poorly placed.
Heat and steam deserve equal attention. Coffee machines can release warmth and moisture into the niche, especially during repeated use. Follow the manufacturer’s ventilation openings and clearance instructions exactly. Don’t cover vents with decorative panels, add insulation that the manual doesn’t permit, or install a tight door that traps heat around the appliance.
If the cabinet includes a lift-up door or pocket doors, confirm that the open hardware won’t block ventilation or interfere with the machine controls. In some layouts, a fixed trim panel is safer and easier to maintain than a door that must remain open during operation.
The final arrangement should be reviewed by the cabinet designer, electrician, plumber, and appliance installer. Each trade needs the same appliance specifications. That coordination helps prevent a finished cabinet from hiding an inaccessible connection or an incorrectly positioned outlet.
Choose Cabinet Materials for Fort Myers Conditions
Fort Myers kitchens deal with high humidity, strong sunlight, tracked-in sand, and frequent temperature changes from air conditioning. These conditions don’t eliminate your material choices, but they make construction quality and finish protection more important.
Ask how the cabinet boxes, edges, shelves, and finish will handle moisture near the coffee machine. Steam can collect around the appliance, while occasional spills may reach the shelf or side panels. A durable, easy-to-clean finish is useful in this location.
Edge treatment matters because exposed seams can absorb moisture more readily than sealed surfaces. Your designer should review the shelf edges, cutouts, filler strips, and any openings created for cords or plumbing. The goal is a finished installation, not raw material hidden inside a niche.
A built-in coffee machine cabinet also needs stable support. Confirm the shelf construction and attachment method before placing a heavy appliance inside. If the shelf is adjustable, make sure the adjustment system can carry the machine without sagging.
Stock cabinetry can work when the available widths and heights match the appliance. TEC Cabinetry Plus explains how stock kitchen cabinets can provide practical options for Fort Myers remodels, including cabinet construction and moisture considerations. Custom modifications may still be needed for the coffee machine’s opening, ventilation, or utility connections.
Keep strong sunlight in mind when selecting the finish. A coffee station near a bright window may show dust, fingerprints, or uneven fading more quickly than a shaded area. Sample doors viewed in the actual kitchen can give you a more accurate impression than showroom lighting.
Cabinet Design Details That Improve the Coffee Station
Good cabinet design makes the coffee station feel part of the kitchen instead of an appliance placed inside a box. Align the machine’s trim with nearby oven, refrigerator, or pantry lines when possible. Consistent reveals and fillers help the installation look intentional.
Storage below the machine can hold mugs, filters, beans, and cleaning supplies. A drawer is often easier to use than a deep shelf because you can see its contents without reaching around a heavy appliance. If you store beans nearby, choose a cool, dry location away from direct sun and steam.
A shallow drawer for stirrers and measuring tools can keep small items from spreading across the counter. However, don’t sacrifice the clearance needed for the machine’s drip tray or lower service panel.
Consider how the station works when two people use the kitchen. A location beside a main traffic path may create congestion when the machine door is open. A corner can provide visual separation, but it may limit access to one side of the appliance.
Finishing panels also need attention. The visible side of a tall appliance cabinet may require a finished end panel, especially if it faces the dining area or an open walkway. Filler pieces can close small gaps beside the machine and maintain the cabinet line.
For a clean look, coordinate the coffee machine trim with cabinet hardware and nearby appliances. That doesn’t mean every finish must match perfectly. The proportions, spacing, and alignment should feel consistent.
Coordinate the Cabinet Order Before Installation
Order the appliance before the cabinet production date whenever possible. The final model number gives the designer the correct cutout requirements and prevents costly changes after delivery.
Provide the cabinet team and tradespeople with the same installation guide. Mark the planned machine location on the kitchen drawings, including the outlet, water line, drain, ventilation openings, shelf height, and finished panels.
Before installation, confirm the following:
- The cabinet opening matches the final appliance specifications.
- The shelf and cabinet sides have adequate support.
- Electrical, plumbing, and ventilation locations remain accessible.
- Adjacent doors and drawers open without striking the machine.
- The countertop provides a usable landing area.
- Trim panels and fillers are included in the order.
- The installer has reviewed manufacturer instructions and local requirements.
A site check after rough electrical and plumbing work can catch problems while changes are still manageable. Once the cabinets, countertop, backsplash, and appliance are installed, moving a connection becomes far more difficult.
Conclusion
A successful built-in coffee machine cabinet starts with the appliance manual, not a cabinet catalog. Confirm the cutout, depth, door movement, support, ventilation, electrical service, and plumbing before finalizing the layout.
For a Fort Myers kitchen, also select finishes and construction that can handle humidity, steam, spills, and frequent cleaning. When the cabinet team and licensed trades coordinate early, the finished coffee station can look tailored while remaining comfortable to use and service.