
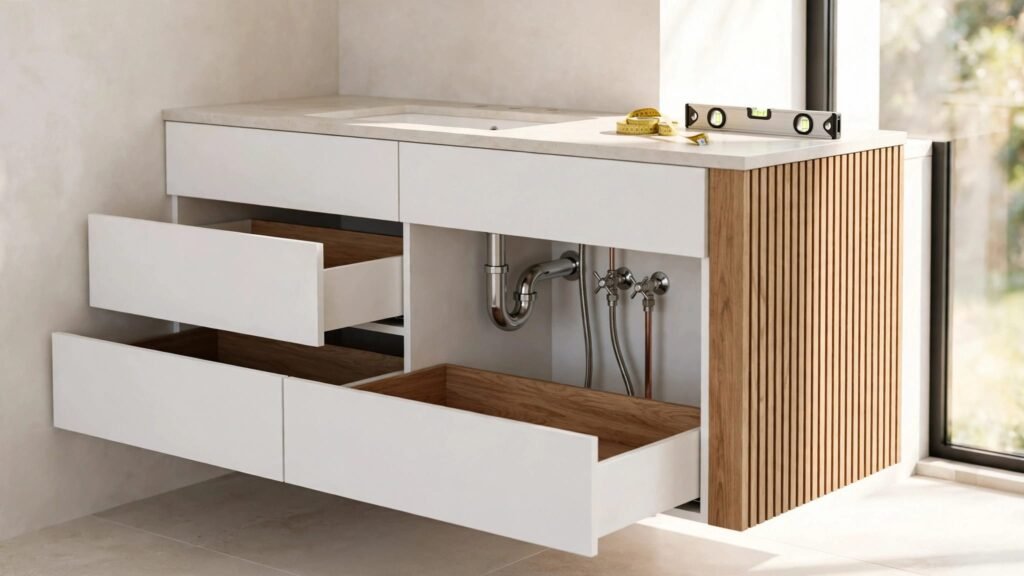
A vanity can fit the wall perfectly yet fail when a drawer, door, or service component hits a shut-off valve or pipe. Bathroom vanity plumbing clearance needs attention before you order the cabinet or countertop, not after installation begins.
Modern vanities often replace open sink cabinets with deep, full-extension drawers and narrow drawer banks. That storage is useful, but it leaves little room for a drain, P-trap, water lines, and valves. Measure finished cabinet clearances before ordering, then coordinate later pipe placement to keep every drawer and door working as intended.
Key Takeaways
- Measure bathroom vanity plumbing clearance from the finished floor and finished wall surfaces, including pipe projection, valves, fittings, and the complete P-trap assembly.
- Compare the plumbing layout with the cabinet’s usable interior, drawer-box depth, slide hardware, sink dimensions, and full drawer travel before ordering the vanity.
- Keep shut-off valves reachable and provide a service zone behind or around drawers so future repairs do not require removing cabinet components.
- Moving pipes or valves is usually the cleanest fix for major conflicts, while limited drawer notches should preserve slide mounting areas and drawer strength.
- Test every drawer, door, shelf, drain connection, and shut-off valve after the cabinet is installed, and confirm the finished layout meets local plumbing and accessibility requirements.
Start With the Vanity Cabinet, Not the Pipe Location
Existing plumbing rarely lands where a new vanity needs it. Before a bathroom renovation, document conditions before demolition or ordering. Record wall stub-outs, water supply lines, drain locations, vent connections, trim, baseboards, and shut-off valves, including their access points.
Measure from the finished floor and finished side walls for the vanity plumbing rough-in. Then measure from the finished wall face to the farthest point of each pipe or valve. Drywall thickness, tile, and trim can change a measurement enough to cause a clash.
Record the cabinet’s usable interior
Cabinet width and exterior depth vary by manufacturer, and exterior depth isn’t the same as usable drawer clearance. Ask for the cabinet specification sheet showing drawer-box depth, glide placement, sink cutout location, and the full travel of cabinet drawers. Compare the water supply lines with that usable interior before approving the layout.
False fronts and open shelving give a sink base room for off-center plumbing, while a custom vanity can be shaped around it. Double sink vanities need careful planning for two drain locations and two supply locations. Review bathroom vanity drawer layouts before choosing storage that conflicts with the wall plumbing.
Check the sink, not only the cabinet
The sink basin takes up more space than its countertop opening suggests. Deep vessel-style basins, large undermount sinks, and double-bowl layouts can occupy the same zone as the drain assembly. Faucet valves control the fixture, while wall-mounted shut-off controls serve the supply lines.
Because sink dimensions vary by manufacturer, get the sink’s cut sheet before finalizing the cabinet design. It should show the sink bowl’s depth and drain position. Assess the cabinet, sink, faucet, and drain as one coordinated plumbing system. A drain several inches off the cabinet centerline can make a centered drawer layout impractical.
A vanity drawer needs clearance along its entire travel path, not only when it is closed.
Typical Vanity Plumbing Rough-In Dimensions
Common vanity plumbing rough-in dimensions are useful trade references, not universal requirements under building codes. Rough-in centerlines are starting points, not finished clearances inside the installed cabinet. Before opening a wall or changing supply or drain connections, confirm the adopted local plumbing code, fixture instructions, faucet specifications, and applicable accessibility requirements with a licensed plumber.
For a standard lavatory, trade references commonly place hot and cold water supply lines about 20 to 22 inches above the finished floor. The hot line goes on the left, and the cold line goes on the right.
Place supply lines where valves remain reachable
A common layout places the water supply lines about 4 inches center-to-center, but faucet valves may have requirements that differ from wall shut-offs. The key measurement is where the shut-off valves sit after installation.
Plan the water supply lines so the valves remain reachable for repairs. Avoid locating them directly behind a fixed drawer box, drawer glide, or cabinet divider. A removable shelf or wide sink cabinet provides better access than a tightly fitted drawer bank.
Center the drain under the sink
A lavatory drain pipe often sits around 18 to 20 inches above the floor, centered beneath the sink. The drain line should follow that centerline into the trap connection.
Many residential lavatories use a 1-1/4-inch or 1-1/2-inch P-trap assembly, so verify its size against the fixture, cabinet depth, and trap manufacturer’s requirements. Confirm the fixture, trap, faucet, and pipe materials work together in the plumbing system.
There is no reliable one-size-fits-all setback from the vanity’s back wall. Measure pipe projection from the finished wall face, rather than assuming a universal cabinet setback, and compare it with the cabinet’s open plumbing bay. The trap assembly needs room to turn, connect, and remain accessible.
Map Bathroom Vanity Plumbing Clearance Before Ordering
The best time to solve a pipe conflict is during design. Make a simple field sketch with the vanity elevation and plan view. Map the plumbing system, fixture connections, and cabinet components, noting each pipe’s centerline, diameter, projection, and distance from the cabinet sides.
Overlay the proposed vanity dimensions on the sketch, including the vanity plumbing rough-in. Check each drain pipe against the cabinet boundaries.
For double sink vanities, mark both bowl drains and check whether the vanity plumbing rough-in aligns with an open cabinet bay or drawer stack.
Measure pipe location in three directions
Take each measurement twice. Old homes can have walls that are not square, and tile can conceal uneven surfaces.
Use these reference points:
- Measure vertically from the finished floor to the center of the water supply lines and each drain stub-out.
- Measure horizontally from a fixed side wall to every plumbing centerline.
- Measure pipe projection from the finished wall surface to the outermost edge of a valve, cap, or fitting. Check the full pipe clearance, not just the centerline.
- Record the cabinet’s interior depth and the depth of every drawer box when fully closed. Map the complete P-trap assembly within that space.
A paper template can help, although a cabinet professional can often work from accurate field dimensions and product drawings. A bathroom vanity design consultation is especially helpful when the room has off-center plumbing or needs a custom vanity.
Account for the drawer hardware
Full-extension slides run along the drawer-box sides, so drawer clearance must include their full travel path, slide hardware, and closed drawer depth.
Water supply lines can project into a drawer bank. A small pipe notch can interfere with a slide, preventing smooth closing or reducing its rated load.
Leave room around the plumbing bay for installation and service. The drawer must clear the pipe, and the homeowner also needs space to turn a valve or remove the trap. The final check must confirm finished clearance with the cabinet and drawer hardware installed, not just rough-in centerlines. A tight fit that looks acceptable on installation day can become frustrating during a leak repair.
Fixing a Drawer That Hits Plumbing Pipes
When a new vanity reveals an incompatible vanity plumbing rough-in, moving the pipes is usually the cleanest solution. A licensed plumber can shift water supply lines, the drain line, or shut-off valves inside the wall when the framing and local requirements allow it.
Still, opening the wall isn’t always necessary; the right repair depends on interference, drawer clearance, and local requirements for concealed work. A conflict involving a door, pull-out, or drawer may require a different solution. During a bathroom renovation, weigh wall access, permits, framing, and locally adopted building codes before changing the plumbing system.
Modify the drawer only when the interference is limited
A shallow, carefully planned notch at the rear of a drawer can work when a pipe enters only a small portion of its path. Remove the drawer and mark the actual contact point with the cabinet installed.
Cut only enough material to clear the obstruction. An oscillating multi-tool gives control in tight spaces. Seal exposed wood edges afterward, especially in humid bathrooms where raw material can absorb moisture.
Do not cut through drawer-slide mounting areas or remove so much material that the drawer box loses rigidity. A cabinetmaker can rebuild the rear section of a drawer as a U-shaped box when plumbing occupies the center.
Shift valves and pipe angles inside the cabinet bay
A protruding shut-off valve often causes more trouble than the supply stub-out itself. A licensed plumber may reposition it farther back, change its orientation, or use approved offset fittings to keep the water supply lines closer to the wall.
PVC pipes, copper pipes, and PEX tubing each require different approved fittings and joining methods. PVC typically uses compatible solvent cement, copper may use solder or approved press methods, and PEX commonly uses approved crimp, clamp, or expansion systems. Have a licensed plumber evaluate any concealed connection or material transition; don’t bury an unapproved connection in the plumbing system behind a cabinet.
Avoid accordion-style flexible drain tubes as a permanent workaround. Their ridges collect debris, and their shape can make proper slope and P-trap alignment difficult. A rigid tubular drain arrangement is easier to clean and service.
Give the P-Trap Room to Do Its Job
The vanity plumbing rough-in should reflect the actual sink, tailpiece, drain-arm geometry, cabinet depth, and local requirements. The curved water seal in the P-trap blocks sewer gases from entering the bathroom. Poor alignment, drawer contact, or tension can let sewer gases escape, cause leaks, or impair drainage.
The trap should connect directly below the sink drain and turn toward the wall stub-out without stressing the joints. This supports wastewater flow and keeps the cleanout and slip joints accessible through the cabinet opening.
Avoid common drain-placement mistakes
A drain that lands too high can conflict with a deep sink basin. One that lands too low may force an awkward trap arrangement. An off-center drain can also hit a drawer divider or reduce storage on one side.
Don’t assume the visible pipe is the only concern. Test-fit the complete plumbing system before permanently installing drawer fronts, shelves, or organizers. Include the drain pipe, drain arm, tailpiece, stopper linkage, supply connections, and cabinet hardware.
Use a clear service zone behind the drawers
Many well-planned vanities reserve a shallow open band along the back wall for plumbing. This zone can hold water supply lines behind the drawers, protecting storage while preserving service access.
For a drawer-heavy cabinet, a U-shaped top drawer may provide a useful compromise. It creates storage around the sink and leaves a center void where water supply lines can share space with the trap and valves. Lower drawers may remain full width if the plumbing stays high and close to the wall.
Doors, Floating Vanities, and Accessible Layouts
Doors are more forgiving than drawers because their swing path begins at the cabinet face. Yet hinges, interior shelves, and pull-out trays can still hit exposed valves or a drain assembly.
A furniture-style vanity often hides existing pipes more easily because it has a larger open sink base. Explore floating and furniture-style vanities when deciding how much plumbing flexibility the room needs.
Plan a floating vanity around wall support and pipe height
Coordinate the vanity plumbing rough-in with the existing wall layout before choosing a floating installation. Floor-mounted water supply lines can work only if they rise within the cabinet’s open interior and remain concealed.
Pipes that emerge below the vanity remain visible unless the design includes a cover, wall modification, or custom vanity for unusual pipe elevations.
A floating vanity also needs secure blocking or an approved mounting system. Confirm the cabinet’s installation requirements before closing the wall. The plumbing system must account for wall support, supply routing, drain placement, and cabinet load capacity.
Meet accessible clearances without trapping the plumbing
For an accessible lavatory, applicable U.S. Access Board guidance limits the higher of the rim or counter surface to 34 inches above the finished floor. The space below needs a 30-inch minimum width, plus defined knee and toe clearances.
These are finished, installed dimensions, not pipe centerlines or cabinet plumbing locations. Check applicable local accessibility requirements and building codes before finalizing the layout or mounting system.
That open area can leave the P-trap and water supply lines exposed. Use protective covers where required, and keep hot surfaces and sharp edges away from knees and legs. A licensed plumber should handle wall plumbing changes or exposed service relocation. Accessibility changes both the vanity style and the plumbing plan.
Test Everything Before the Final Installation
Install the cabinet before fastening the countertop or loading the cabinet drawers. Test the installed vanity plumbing rough-in as a complete plumbing system. Open each drawer fully and swing every door. Check shelves, pull-outs, and organizers too, because plumbing can interfere with more than drawers.
Then connect the faucet and drain, and test the faucet valves at the handle. Inspect the water supply lines, run water through the drain pipe, fill the sink, and release the stopper. Watch the drain line as water flows toward the wall connection.
Use this final check:
- Each drawer opens fully with adequate drawer clearance, without rubbing pipes, valves, or drain parts.
- Shut-off valves can be reached and turned without removing cabinet components, and the water supply lines remain accessible for service.
- The P-trap has no strain, leaks, or contact with drawer hardware, confirming the plumbing system is aligned.
- The sink basin, tailpiece, and drain stopper linkage fit inside the cabinet.
- Doors close squarely, and shelves, pull-outs, and organizers don’t block future plumbing service.
Frequently Asked Questions
How much clearance does plumbing need behind a bathroom vanity drawer?
There is no universal clearance because cabinet, sink, and plumbing dimensions vary. Measure the complete pipe and valve projection against the drawer box, slide hardware, and full travel path, while leaving room for installation and service.
Where should vanity shut-off valves be located?
Shut-off valves should remain reachable without removing a fixed drawer box, divider, or other cabinet component. A removable shelf or open sink base generally provides better access than a tightly fitted drawer bank.
Can a drawer be notched to clear a plumbing pipe?
A shallow rear notch can work when the pipe interferes with only a limited part of the drawer. Cut only enough material to clear the obstruction, avoid slide mounting areas, and seal exposed wood edges; major conflicts are usually better solved by relocating the plumbing.
What is the best location for a bathroom vanity drain?
The drain should align with the sink drain and provide enough room for the tailpiece, P-trap, and drain arm to connect without strain. Its final position depends on the sink, cabinet, wall projection, and local requirements, so measure the installed components rather than relying on a universal setback.
How can plumbing clearance be checked before final installation?
Install the cabinet and test the complete plumbing layout before fastening the countertop or loading drawers. Open every drawer and door, operate the shut-off valves, run water through the drain, and check for contact, leaks, strain, and future service access.
A Vanity That Works Beyond Installation Day
Good bathroom vanity plumbing clearance protects more than a cabinet finish. It keeps drawers usable, valves accessible, and drain parts aligned over time, while proper trap positioning helps prevent sewer gases.
The strongest plan starts with project-specific measurements, since cabinet and fixture dimensions vary. Coordinate cabinet storage, water supply lines, and the sink, faucet, drain, and service needs as one plumbing system. Check the vanity plumbing rough-in and finished pipe clearance around pipes, valves, and drain components against local plumbing and accessibility requirements.