 Skip to content
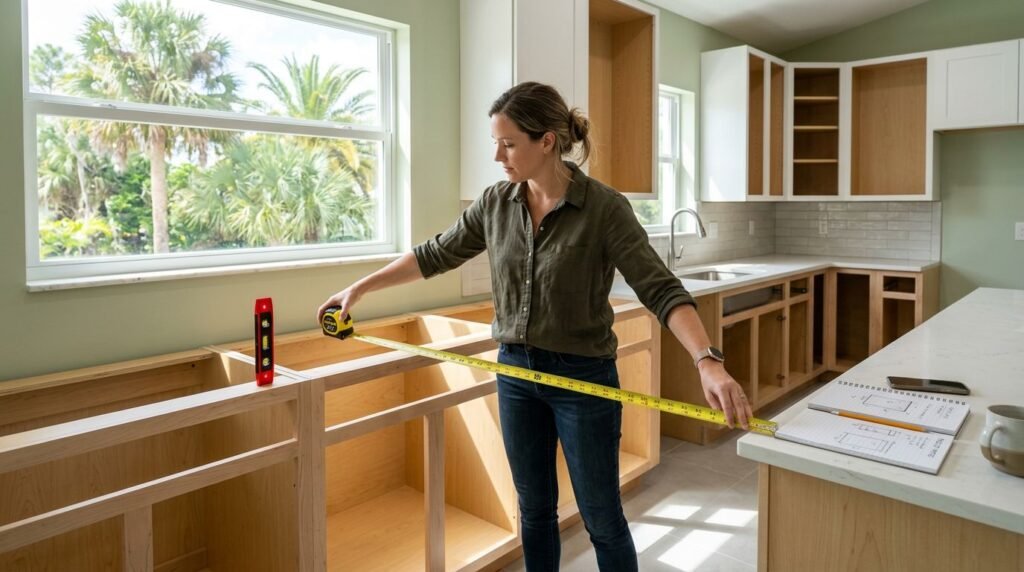
Ordering cabinets without solid kitchen cabinet measurements is like buying shoes without checking the size. You might get lucky, but most people don’t.
The good news is that measuring a kitchen isn’t complicated. It just needs a calm approach, clear notes, and a few checks that most homeowners skip. In this guide, you’ll measure your room, openings, appliances, and utilities so your cabinet professional can price and plan with confidence.
If you’re in Fort Myers, this also helps when you’re comparing layouts, finishes, and cabinet design options before you commit.
Set yourself up for accurate kitchen cabinet measurements
Start by measuring in inches and record everything to the nearest 1/8 in. That small detail matters when walls bow, floors slope, or corners aren’t square (which happens in plenty of homes).
Gather a few basics: a 25-ft tape measure, a pencil, a notepad, painter’s tape for labeling, and a 4-ft level (a laser measure helps, but it’s optional). If you can, measure with a second person. You’ll get straighter tape pulls and fewer “was that 112 or 121?” moments.
Before you touch the tape, make a simple sketch of your kitchen. It doesn’t need to look pretty. Draw each wall as a straight line, then label them (Wall A, Wall B, and so on). Leave space around the sketch for notes.
Use this quick checklist to avoid re-measuring later:
- Write the date and room name on every page of notes.
- Measure each wall at three heights (near the floor, mid-wall, and near the upper cabinets).
- Mark windows and doors on the sketch before you measure them.
- Take photos of each wall, then photograph your notes too.
To anchor your expectations, here are common cabinet size references you’ll hear during planning:
| Item | Typical size (inches) | Notes |
|---|---|---|
| Base cabinet depth | 24 | Countertops often add 1 to 1 1/2 overhang |
| Base cabinet height | 34 1/2 | Add countertop thickness (often 1 1/2) |
| Wall cabinet depth | 12 | Some designs use 15 for more storage |
| Wall cabinet heights | 30, 36, 42 | Depends on ceiling height and crown |
| Tall pantry depth | 24 | Match base depth in many layouts |
| Tall pantry heights | 84, 90, 96 | Depends on ceiling and soffits |
If you want to see how these sizes look in real homes, browse a cabinet portfolio before you lock in your plan.
Step-by-step: measure walls, openings, and cabinet runs
Work around the room in one direction (clockwise helps) so you don’t miss anything. Keep your notes consistent, even if you plan to change the layout.
- Draw the floor plan and label walls. Mark each corner and give each wall a letter. Add a north arrow if it helps you stay oriented.
- Measure each full wall length. Measure from corner to corner along the wall. Then measure the same wall again at a different height. Write down all readings, not just the “best” one.
- Check for out-of-square corners. Measure from one corner diagonally to the opposite corner (if the room shape allows). If the two diagonal measurements don’t match, the room isn’t square. Note the difference.
- Measure ceiling height in multiple spots. Record ceiling height at each corner and near the middle of long walls. If there’s a soffit or bulkhead, measure its height from the floor, its drop from the ceiling, and how far it sticks out.
- Measure windows completely. Record rough width and height, sill height from the finished floor, and the distance from the nearest corner to the window casing. Also note trim thickness if it affects cabinet clearance.
- Measure doors and door swing. Record door width, casing width, and hinge side. Then note the swing path so tall cabinets don’t block it.
- Measure existing cabinet runs (if present). Record the total run length, then break it into segments. Measure from corner to first cabinet, then to the next break, and so on. This helps you spot filler needs.
- Mark obstacles on the sketch. Think: radiators, floor vents, columns, phone jacks, low outlets, and anything that sticks out from the wall.
Measure walls at the floor, mid-wall, and at upper-cabinet height. Cabinets follow the tightest spot, not the widest one.
Don’t forget appliances, clearances, and utilities
Appliances can make or break a layout, so don’t guess. Pull the model numbers and look up the spec sheets. Manufacturers list the required cutout width, height, depth, and ventilation needs. Your kitchen cabinet measurements should match the appliance requirements, not the other way around.
Focus on three practical areas:
First, appliance openings and door swings. Fridges need room for the doors to open without hitting a wall or an island. Dishwashers need space to drop open without blocking a main path. Ovens and ranges need clearance for handles and nearby drawers. If you’re changing appliance sizes, record both the current and planned models.
Second, walkways and pinch points. Many homeowners feel best with about 36 to 42 inches in main walk paths, especially around an island. Also check corners where a lazy Susan, trash pullout, or dishwasher might conflict with a handle or adjacent door.
Third, utilities and “fixed” locations. Even if you plan to move plumbing or electric, write down what you have today. It helps your designer price the job and spot risks early.
Use this utility checklist and record each item’s location two ways: distance from the nearest corner (left or right) and height from the finished floor:
- Sink plumbing: drain center, hot and cold shutoffs
- Dishwasher connections: water supply, drain route, outlet location
- Range hookup: 240V outlet or gas stub-out (if applicable)
- Hood venting: duct location and size (if present)
- Outlets and switches: especially along backsplash runs
- Water line: fridge supply location (if applicable)
If you want reassurance you’re not missing a detail, it helps to read a few customer testimonials and see what others appreciated during the planning and measuring stage.
Measurements to hand your cabinet professional (plus a smart next step)
Once you’ve measured, condense your notes into a single page. That makes it easier to quote and start cabinet design without chasing missing numbers.
Here’s a simple summary table you can copy into your notes:
| What to provide | What to include |
|---|---|
| Room sketch | Labeled walls, corners, and directions (A, B, C, D) |
| Wall lengths | Each wall measured at floor, mid-wall, and upper height |
| Ceiling info | Ceiling height at corners, soffit size and location (if any) |
| Windows | Width, height, sill height, distances to nearest corners, trim depth |
| Doors | Width, location from corner, casing depth, hinge side, swing path |
| Appliance list | Model numbers, cutout requirements, door swing notes |
| Existing cabinet run (if any) | Total length and segment breakdowns |
| Utilities | Shutoffs, drains, outlets, gas (if applicable), venting, each with height and offset |
| Level and plumb notes | High spots, out-of-plumb walls, out-of-square diagonal difference |
| Preferences | Style goals, storage needs, and any “must keep” items |
Even with careful measuring, a final on-site measure should happen before you order. Cabinets are precise, while houses are rarely perfect. For Fort Myers projects, schedule a pro measure and layout review, then let your designer confirm fillers, scribes, and clearances in the real space. When you’re ready, you can schedule free consultation to verify everything before the order is placed.
Accurate kitchen cabinet measurements give you better pricing, fewer surprises, and a smoother install. Take your time, write everything down, then hand off clean notes so your cabinet professional can turn them into a plan that fits the room you actually have.
